How to Draw a Professional Spider

Share
How to Draw a Professional Spider

In 2009, I was the queen of niche websites. Really. I owned like hundreds of them. At the time, I also was very good at getting organic search traffic, so I decided to make a website all about drawing.

And it’s true: for a long time I ranked for the phrase “How to Draw a Spider”.

I no longer have that website, but today I wanted to share it. I apologize in advance for low-resolution photographs. This was 2009. To preserve the original integrity of the article, I have kept all photos in their original form!

Below is my original great tutorial so that you too can draw badly.


How to Draw a Spider Step by Step

Do you want to learn how to draw a spooky spider for Halloween? If you can count to the number eight, then you can make a spider!

Why the number eight? Because that is how many legs spiders have! That’s right, spiders have eight legs!

But even if you can’t count to eight, that’s okay. You can still make a spider and have a grown up or older kid help you count to eight if you can’t do it on your own.

The Basics of Spider Drawing

Spiders are made with two shapes. You need to make circles and you need to make lines. If you make lines and circles you can make it pretty easily.

Here is the picture of my spider:

how to draw a spider

In this picture, he’s only a little bit spooky. I think because he is a cartoon he is much less scarier than seeing one that you would just find somewhere!

In fact, I might say he is even kind of cute!

To really draw a good spider, it’s all in the details. I thought about putting shoes on his feet where his legs are, in case his feet would get cold, but decided to just show the basics today. Maybe later I will go into detail about how to draw spiders with shoes, or maybe just how to draw shoes.

It really just all depends. You never know what I’m going to decide write about and share here!

So, here is how we are going to draw a spider step by step:

  1. Draw a Big Circle: We are going to make a big circle and that will be his belly. Did you know that spiders like to eat other bugs? So he needs to have a belly!
  2. Draw a Little Circle: We’re now going to draw a little circle right on top of our big circle. This little circle is going to be just perfect for his head.
  3. Draw a Face: To draw a face on our spider, our next step is to give him some eyes and a mouth. I decided to make my spider a happy one. For the eyes, all I did was draw two more smaller circles and then put another small circle into each one and colored it in to give him eyeballs. For the smile, I just drew a nice upward curving line.
  4. Let’s Give Him Some Legs! Now is the most fun thing about drawing spiders – drawing the legs! How many legs do spiders have? They have eight legs! {Weren’t you paying attention to what I said earlier? Geez!} So let’s draw four lines on one side of the spider, and then we’ll draw four more legs on the other side. Now let’s count them! One, two, three, four, five, six, seven, eight. Yup! We have eight legs now! Yay!
  5. Add Some Accessories if You’d Like: Now that our spider is complete, you can give him shoes, maybe a hat, maybe a scarf even so his neck won’t be cold. {Do spiders have necks? Good question, I’m not really sure.} I didn’t draw any of these fabulous accessories for my spider, but that doesn’t mean you can’t. I think it adds a nice decorative touch if you have the extra time or are feeling really creative.
  6. If you want, you can also draw a spiderweb. Spiderwebs are not too hard to draw, you just need to draw a bunch of lines. Now you have the perfect almost spooky kind of cute cartoon spider to draw and use for Halloween!

As this article gained some traffic, I started to get some critical comments. I think I handled it like a pro.

First, I wrote a polite reply to the original commenter in that article’s comments.

I would really love to find this commenter, because he/she pushed me to do better! And, original commenter, I’m sorry that you don’t think my spider was not professional! I’ll make it up to you, just get in touch using your real name/email so I know it is really you!

Anyways, instead of being defeated by this criticism, I then edited the article to add a way more clearly professional spider drawing.

Let’s get back to the original post, shall we?


Update: There seems to be some controversy that this spider is not that great and does not have that “professional vibe” that some are looking for. And so, to help with that, I have decided to pull out all the stops and show you a truly professional looking spider:

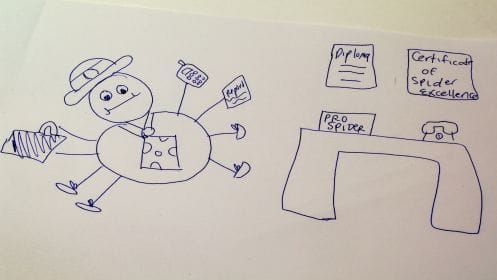
Spider Excellence: A Professional Spider

As you can see, what I did to draw this guy to make him look much more professional was to simply change his facial expression and add a few basic accessories.

Professional spiders probably don’t smile nearly enough, because they are stressed out with work. Note here that his smile is really just more of a straight line with a couple of curves. He wants to smile, but he can’t – he has to maintain a professional appearance. He’s working, remember?

Shoes and tie and a hat are a must, since certainly it is not professional to go to work without the proper attire.

A cell phone, business report, and briefcase complete the look. He has eight legs, so you can really use your imagination to unleash your creativity. Add a lot of accessories here if you’d like!

And then, we added some scenery, because sometimes you just need to have your subject placed in the right setting.

So a desk was in order, furnished with a sign stating “Pro Spider” and telephone. In the background, you can clearly see a diploma and sign which reads “Certificate of Spider Excellence”.

With a sign which reads “Pro Spider” there is no question in my mind that our spider is now truly professional looking.

Don’t be afraid to add some detail! By adding a few well thought out accessories you can turn even the most basic of drawings into something special.

In drawing anything, you really must start with the correct framework if you wish to be successful in conveying and achieving the look you desire. If you can get the circle and lines part down, the rest is all up to you!

I hope you enjoyed this tutorial about how to draw a spider, as well as how to give it a more professional look. Don’t be afraid to use your creativity! What do you guys want me to draw next?


A Step by Step Framework for Making Art

Moral of the story: Don’t let criticism get you down. You just might be able to use it to make something even better!

Also, hopefully I inspired you to draw more professionally.

Now it’s your turn! You should draw a spider because Halloween is coming up soon! I want to see it!